
30
May
How do we convert to forefoot running
Having considered the possibility of changing your running style the question arises – how do I do that?
There are usually 2 driving factors that make athletes consider changing their style. It is often athletes that are quite experienced but always have a niggling knee pain, an achilles that flares up every few months or a back pain that spasms every now and again.
The other reason to change is the possibility of improved efficiency and therefore improved times.
Whatever the motivating factor, it needs to be done with a plan and some background conditioning to allow your body time to adjust to the change in load.
Thinking of your body as a tensegrity model held together by elastic (fascial) supports it is naturally designed to run and absorb the loads placed on it without external assistance. However, we must remember that your body has spent most of it’s life with the external support of shoes and will have adapted to walk and run with shoes on. Possibly those that spend a great deal of time in bare feet will convert to forefoot running more quickly that those that are in shoes all year around but it doesn’t seem socially acceptable to go to Tesco’s in barefeet. I’ve done it and you get some very strange looks.
In my previous article I touched on the idea of fascia being the major shock absorber. I mentioned the Plantar Fascia and the Achilles tendon as a combined system that absorbs the impact of each stride and even giving back some “free energy” from its recoil properties. I want to follow this idea further up the body to how the whole sytstem may work together.
If we study the body following the concept of “Anatomy trains” as described by Dr. Tom Myers we can see how important using our fascia becomes. There is plenty of his work now published online and to study all of it is a big ask. But for the purpose of this article about running gait I would like to refer to the “Spiral line.”

If we look carefullly at the foot it shows how the myofascial line runs under the foot like a stirrup. This blends into the lateral side of the knee, into the ITB and lateral hamstring. This line continues up to the pelvis where one portion stabilises posteriorly to the ipsi(same side) lateral back extensors, but also splits anteriorly and diagonally to the opposite shoulder. The idea is that as the foot strikes the floor and begins to pronate it instantaneously tensions along the length of this line. This pattern of load distribution both sends the load across a long line but also instantly offers a stabilising pattern for the skeleton (tensegrity toy) to stabilise on a single leg stance. The fascia is able to tension along its length even more quickly than the muscle system, which requires a nerve impulse and a subsequent muscle contraction and would be too slow for this stabilising mechanism, and also costly in terms of energy expenditure.
This is reflected well in an elite runners gait. Watch an elite distance runner, particularly the Kenyans, and you will see a high cadence at around 180 strides per minute, which is achieved by a very short contact time and relatively short stride length. Each stride / foot strike is an individual plyometric event which uses maximum recoil from the fascia and is very efficient in energy expenditure. To gain maximum efficiency, we need to train the tissues to accept this load.
The tissues will respond to an appropriate load. By putting the target tissues under the right load it will lay down new protein fibres within the fascia along the line s of stress required. To target the fascial tissues over the muscle system the cadence needs to be high – up at around 180 / min. What this feels like is doing small jumps on the spot – as if skipping rope like a boxer. If you slow this down and feel that you land each jump, allow your knees to bend a tiny bit and then jump again you will quickly feel your quads doing some work and be aware of fatique in your legs. Return to the quicker bouncing style and the “work” done by the legs is less and your heart and lungs become the limiting factor. We could then keep the same cadence but change to running on the spot and we will begin to engage the fascial stabilising system described above.
Exercise Factor 1: keep the foot strike rate high – around 180/min to target the fascial system rather than the muscle system. Download a metronome app and set it to 180/min.
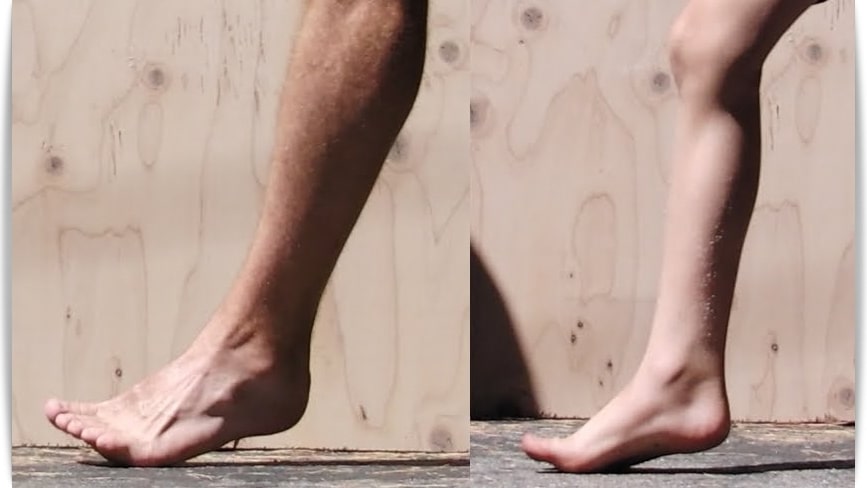
Ideally the following exercises would be done in front of a mirror to allow you to see good alignment and symmetry. With each foot strike I am looking for the foot to land on the ball of the foot. Quickly the foot begins to pronate (the medial arch flattens / lengthens but will not go actually make contact with the floor). The heel then drop and kisses the floor before recoiling into the next jump. At the early stage when we are doing jumping or jogging on the spot, the foot strike will naturally happen directly under the hip. This is important as it reduces the braking forces of each contact and as the exercises progress to include moving forward we want to continue to keep the point of contact directly under the hip, rather than in front which is what we see with the Heel Striking style.
Looking a little further up the chain we want to see the knee stays straight over the middle of the foot. A weak chain will allow the knee to drift medially towards the other knee. This breaks the tension in our “stiff” myofascial chain and reduces the efficiency of the stabilising mechanism.
Continuing up the body, we come to the hip and pelvis. Again we are looking for the hip to stay strongly aligned over the knee during contact time – not popping out laterally and finally the pelvis stays quite level. The top of your shorts give a pretty good indication of where your pelvis is. During a poorly stabilised gait you will see the non-weitbearing side of the pelvis drop down on each stride.
We are looking to maintain good alignment throughout each foot strike. We are also looking for symmetry between L and R leg. Small deviations from perfect alignment are probably acceptable if they are symmetrical. A simple test to assess your foot control is to listen. Trying to jump, jog or skip as quietly as possible will mean your foot is striking the floor very efficiently.
Whoever thought running was so complicated !
So, having got the hang of a high cadence, observing good alignment and beginning to feel the foot work as a spring we can do any of the following exercises.
- Jumping on the spot
- Skipping
- Jogging on a trampet/rebounder
- Jogging on the spot
Start these with short intervals of 30 sec with good form. Then progress to 1 min interval – repeat x 4
The next stage is to build this into a new running posture. To allow the foot strike to happen under the hip we need to move the the centre of gravity forward from our normal posture. To feel this, simply stand with your feet shoulder width apart. Staying tall throughout you body gently lean forward from the ankles to the point you feel you are going to fall forward and have to take a step forward. That tipping point is the point at which your centre of mass moves ahead of your balance point in your foot and that is where we want it when you start running. In very simple terms we can think of running as constantly falling forward and simply moving each foot forward quickly enough to stop us falling over. Again this is maximally energy efficient as gravity is effectively doing some of the the work for us.
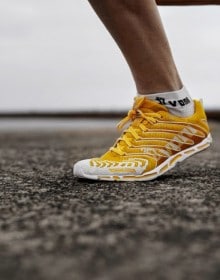
To practise this a neat drill is to tie a big band around your waist and attach it to the wall behind you. This allows you to lean forward just beyond the tipping point and repeat the jogging patterns as above. Then transfer this feeling onto the treadmill, again refer to the mirror and check that good foot/knee/hip alignment is maintained. Up until now all these drills can be done in bare feet to allow you to feel the points of contact in the foot and see how the foot controls pronation and the heel kisses the floor. Once you start to run on a treadmill a pair of shoes is probably appropriate. Whether you start extreme with Vibram 5 toes or a bit less extreme with a very neutral sole, the foot will benefit from a bit of protection. The role of the shoe is now to only offer some protection. We are not asking for any support or control from the shoe but simply allow the foot to function naturally and be able to feel what is happening. On foot strike the immediate pronation of the midfoot is essential to stimulate the fascial chain to tighten up and stabilise the skeleton.
From the treadmill you need to get outside and begin to feel the new technique in practice. Starting on a stable surface. Firm grass is great. Run in your unsupportive shoe and allow your foot to feel how it is working. If it is appropriate to run in bare feet, then try it and feel your posture adapt. It is then a gradual process to wean off the high heeled running shoe into the new shoe.
Running magazines are now packed with adverts for barefoot shoes, neutral shoes, no support shoes. If we believe the stats in “born to run” by Chris McDougall, then the shoes should be chosen on the basis of price; the cheaper the better!!
From here on practise the new skill until it feels natural. How quickly you can progress is a matter of debate. Physiology might dictate that a period of 6 weeks would be required to allow the fascia to change and remodel. That would seem a reasonable period to gradually build up the length of time or distance practising the new discipline.
- Week 1: Treadmill sessions. Warm up with Plyometric drills as described above. Focus on technique and good form. 10 – 15 mins max. Repeat x 3 / week.
- Week 2: Start running outside. Warm up – Plyometric drills.Pick a good surface to run 1 mile drills. Repeat x 3 / week
- Week 3: Continue Plyometric drills. Increase distance by 10% each session
- Week 4: Continue Plyometric drills. Increase distance by 50% each session
- Week 5: Maintain distance and focus on increased speed
- Week 6: Progress to full training schedule.
This is an outline plan. Often this process will make the calf feel a little tight. Listen to your body. Try to rub out any new tight spots with a foam roller or tennis ball. Often work is required through the calves and Plantar Fascia as it adjusts to the new load. If there is any pain more than tightness then consider slowing down how quickly you progress through the schedule above.
From here on in it is about practice. Ideally you will feel a new found freedom and ease in your running that makes you want to go out and do more. People often notice that their feet feel stronger, they are able to get out of bed without hobbling around for the first 5 mins. As often as is possible walk in bare feet and feel the same work going through to the floor. Occasionally revisit the treadmill to check your form and save the money you’re not spending on running shoes to spend on a new wetsuit when the inevetable triathlon bug comes to find you.
 @CGSportsPhysio: